The first thing before doing RackHD development is setup a local environment.
Though the RackHD official provides multiple of release artifacts, such as debian package, ova, docker images, but these are not friendly for developer. This chapter is trying to help you setup a develper-friendly environment.
Prerequisite
Please make sure following prerequiste is met before go ahead:
- Ubuntu Linux. Either 14.04 or 16.04 is OK, Either Server or Desktop version is good. Recommend to allocate at least 16G disk, 2G memeroy and at least 2 network adapters (One for external network, another for RackHD control network)
- You already have a github account
- Git command tool is already installed in your system, otherwise you could install it via
sudo apt-get install git
Steps
1. Install 3rd Parties Services/Tools
Besides a lot 3rd parties libraries, RackHD also relies on some other 3rd parties services and tools, including isc-dhcp-server, MongoDB, RabbitMQ, ipmitool, snmp.etc.
$ sudo apt-get install -y isc-dhcp-server mongodb rabbitmq-server ipmitool snmp
After installation, the isc-dhcp-server, MongoDB, RabbitMQ service should automatically starts,
$ sudo service rabbitmq-server status
● rabbitmq-server.service - RabbitMQ Messaging Server
   Loaded: loaded (/lib/systemd/system/rabbitmq-server.service; enabled; vendor preset: enabled)
   Active: active (running) since Wed 2017-04-19 15:16:47 CST; 18h ago
 Main PID: 1145 (rabbitmq-server)
    Tasks: 70
   Memory: 26.0M
      CPU: 18min 35.836s
   CGroup: /system.slice/rabbitmq-server.service
           ├─1145 /bin/sh /usr/sbin/rabbitmq-server
           ├─1193 /bin/sh -e /usr/lib/rabbitmq/bin/rabbitmq-server
           ├─1380 /usr/lib/erlang/erts-7.3/bin/epmd -daemon
           ├─1426 /usr/lib/erlang/erts-7.3/bin/beam -W w -A 64 -P 1048576 -K true -B i -- -root /usr/lib/erlang -progname erl --
           ├─1529 inet_gethost 4
           └─1530 inet_gethost 4

Apr 19 15:16:38 rackhd-virtualbox systemd[1]: Starting RabbitMQ Messaging Server...
Apr 19 15:16:44 rackhd-virtualbox rabbitmq[1146]: Waiting for 'rabbit@rackhd-virtualbox' ...
Apr 19 15:16:44 rackhd-virtualbox rabbitmq[1146]: pid is 1193 ...
Apr 19 15:16:47 rackhd-virtualbox systemd[1]: Started RabbitMQ Messaging Server.
After installation, the
isc-dhcp-servermay not work well, you can skip it in this step. To ensure it works well, check next section "Configure Network".
Check ipmitool & snmp version by following commands:
$ ipmitool -V
ipmitool version 1.8.16

$ snmpwalk -V
NET-SNMP version: 5.7.3
2. Configure Network
Usually we setup a dedicated network for RackHD (we call it RackHD control network), the isc-dhcp-server should only work within this network and all RackHD controlled nodes should be put within this network as well.
Below example assumes the interface name of RackHD control network is enp0s8
Ubuntu 16.04 and Ubuntu 14.04 have different naming for network interfaces, we usually see
eth0andeth1in Ubuntu 14.04, howeverenp0s3,enp0s8in 16.04. In 16.04, the name has some relation with the real hardware config, so you may see other names.
Add following lines in /etc/network/interfaces:
# RackHD control network
auto enp0s8
iface enp0s8 inet static
address 172.31.128.1
netmask 255.255.252.0
Restart network via:
$ sudo service networking restart
Check the network is setup successfully:
$ ifconfig enp0s8
enp0s8    Link encap:Ethernet  HWaddr 08:00:27:29:b3:f8
          inet addr:172.31.128.1  Bcast:172.31.131.255  Mask:255.255.252.0
          inet6 addr: fe80::a00:27ff:fe29:b3f8/64 Scope:Link
          UP BROADCAST RUNNING MULTICAST  MTU:1500  Metric:1
          RX packets:30 errors:0 dropped:0 overruns:0 frame:0
          TX packets:117 errors:0 dropped:0 overruns:0 carrier:0
          collisions:0 txqueuelen:1000
          RX bytes:9414 (9.4 KB)  TX bytes:18667 (18.6 KB)
Then configure the isc-dhcp-server to let it works in control network, append following lines into /etc/dhcp/dhcpd.conf:
# RackHD added lines
deny duplicates;

ignore-client-uids true;

subnet 172.31.128.0 netmask 255.255.252.0 {
 range 172.31.128.2 172.31.131.254;
 # Use this option to signal to the PXE client that we are doing proxy DHCP
 option vendor-class-identifier "PXEClient";
 option routers 172.31.128.1;
 option domain-name-servers 10.254.174.10;
}
Restart isc-dhcp-server to let the new configuration take effect:
$ sudo service isc-dhcp-server restart
3. Install Node.js
Now the core and most RackHD services are written in JavaScript and run in Node.js environment. So you have to install the Node.js.
As for which Node.js version should I installed, I recommend you to check the TravisCI configuration, take the on-taskgraph for example, the link is https://travis-ci.org/RackHD/on-taskgraph, you could see two versions in build jobs Since the Node.js: 6 is placed under "Allowed Failures", it means the RackHD official tries to run RackHD in Node.js 6.x, but any failure in Node.js 6.x can be ignored. So the Node.js 4.x is the offical promised RackHD version.
RackHD tries to keep the pace with Node.js LTS release, so may be in near future, RackHD will switch to run with Node.js 6.x after all existing compatibility issues are resolved. Nevertheless, the TravisCI config will be updated accordingly, so you can always get the recommended Node.js version from TravisCI.
You can obtain the source code of TravisCI configuration from the
.travis.ymlfile in each repository
The click the "Node.js: 4" for detail build log, you could see which exact version it installs:

Though Node.js 4.x is currently RackHD recommended one, but sometimes your task is to fix the issue on Node.js 6.x. So to help you easily switch between different Node.js version, I recommend you install a Node.js Version Manager firstly, among them, the n is a very simple one, click https://github.com/tj/n for a detail introducation of n.
Install n with following command (assume install n into directory ~/util/n):
$ curl -L https://git.io/n-install | N_PREFIX=~/util/n bash -s -- -y 4.8.2

# make sure the $PATH which contains the new `n` command take effect
$ source ~/.bashrc
Check version by:
$ node -v
v4.8.2
To switch another Node.js version, use following command:
$ n 6.1.0
Since RackHD need sudo right to run services, with above installation, actually the sudo node --version will fail, so you need to explictly add the n into the sudo path by change the file /etc/sudoers
$ sudo vim /etc/sudoers

# Then append the command n into the `secure_path`

$ sudo node -v
v4.8.2

4. Fork Repository
Only a few people have write permission to RackHD official repositories, usually you only have read-only permission, if you want to contribute code into RackHD official repositority, you firstly need to fork it and then submit pull request to RackHD offical repository.
Even for those people who have write permisson to RackHD offical repositories, they should still avoid directly to write offical repositories. Fork repo and then submit pull request is always the right way.
Click the "Fork" button in RackHD official repo: Then you will see your forked repo:
 For the forked repo, you have full premission, you can modify it whatever you want (even delete it!)
5. Clone Source Code
During the whole developement cycle, you need to frequently touch below 3 kinds of repositores:
upstream: point to the remote RackHD official repostiory.
origin: point to your forked remote repository.
local: your local copy of code.
You write code in local code and commit it into local, after everything is ready, you push your local code into origin, then open a pull request from origin into upstream and hopely your code change can be merged by RackHD official.
Also if your local code is out-of-date, sometimes you need to sync up your code with upstream
So while cloning the source code, setup the relationship of upstream, origin and local is also important, this brings convinence for your development.
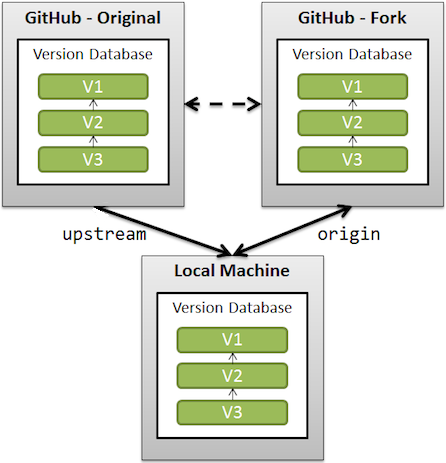
Below is a shell script, which clones all core RackHD services and also setup the upstream:
# !/bin/bash

# replace with your own github account
github_account="yyscamper"

mkdir -p ~/src

for repo in $(echo "on-core on-tasks on-taskgraph on-http on-dhcp-proxy on-tftp on-syslog");do
  # clone my forked repo and set origin to my forked repo
  pushd ~/src
  git clone https://github.com/${github_account}/$repo.git

  # set upstream to RackHD official repo
  popd && pushd ~/src/$repo
  git remote add upstream https://github.com/RackHD/$repo.git

  # sync up the latest change of upstream into origin
  git fetch upstream && git rebase upstream/master

  popd
done
6. Install Dependency
A typical Node.js project usually requires to install some 3rd party libraries via npm, this also works to RackHD.
Meanwhile, there is also some depencency between different RackHD repositories. on-core is the common library that is depended by all other RackHD core services. on-tasks provices task definitions and job code for on-taskgraph and on-http.
The dependency between different repositories has brought a lot complex for development, CI testing, release and deploy. RackHD has realized this is a problem and is actively discussed how to remove or mitigate the dependency. One of the dominant solution is changing RackHD into modularity and then evolve to Micro Services architectures.
Below tools is required before install dependencies:
$ sudo apt-get install -y g++ libkrb5-dev unzip
Before installing dependencies, I recommend you to change the npm prefix under the same folder with all RackHD source code, this will bring convience if you want to mount your source in another OS and run RackHD in that OS. This will be explained in the "Debugger" chapter.
Using following command to change the npm prefix to ~/src/npm:
$ mkdir -p ~/src/npm
$ echo prefix=~/src/npm >> ~/.npmrc
All dependencies for a service is specified in its package.json, run npm install will fetch these packages from npm sever and placed them into node_modules folder.
Since on-core is depended by another repo, the normal npm install will fetch a copy of on-core into node_modules folder. Assume we have a code change in on-core, to make it take effects for every repo, then we have to change the on-core copy for every repo. This is very very unacceptable for developer. So we look forward to a solution which change once for on-core, its change can be automatically applied to all other repos. The npm link is designed to resolve this problem.
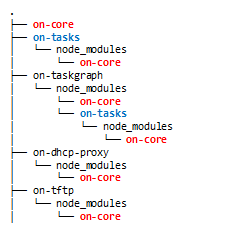
With npm link, the real source code of on-core is stored at the same folder of other repos. For other repos which depend on the on-core, the npm link will assue they are linked with the same on-core.

Below is the shell script which installs dependencies for all repos and also build links between them:
#!/bin/bash

cd ~/src/on-core
npm install

for repo in $(echo "on-tasks on-taskgraph on-http on-dhcp-proxy on-tftp on-syslog");do
  pushd ~/src/$repo
  npm install
  npm link ../on-core
done

for repo in $(echo "on-taskgraph on-http");do
  pushd ~/src/$repo
  npm link ../on-tasks
done
To check whether the dependencies are installed correctly, you could run the unit-testing for each repo. To run unit-test, firstly go the repo's folder, then execute npm install, take on-core for example:
$ cd ~/src/on-core
$ npm test
You need to ensure no failed test cases.
Some unit-test depends on the real MongoDB and RabbitMQ services, if there is test case failure, you could first check whether the MongoDB and RabbitMQ are run successfully.
7. Configure RackHD Services
Download sample config file
8. Run RackHD Services
sudo node index.js
run all RackHD services with pm2
check API response
open Swagger UI page.
9. Download Static Files
10. Deploy Virtual Node
Refer to InfraSIM about how to deploy a virtual node
Verify the virtual node is discovered by RackHD.